Forummaster
Moderator
Username: Forummaster
Post Number: 583
Registered: 11-2001

| | Posted on Monday, April 07, 2014 - 12:51 am: | 


|
Installing Radios in Vehicles – part 3
It's been awhile since I posted Part 2 of this series, but here we have Part 3 – Power Cabling.
Power Cabling 101
Most people think that this is the easiest part of installing a radio, just connect one wire to ground and the other one to 12V positive source, and you're all set. Nothing could be further from the truth. Such a hap-hazardous approach can create a whole heap of problems, from noise on receive to the radio causing issues with the vehicles electrics.
Over the years, both professionally and as a hobbyist, I have seen some strange, weird and downright dangerous ways to run power to a radio. These include running the wire under the rear of the hood (bonnet for non-USA readers) and into the car via the front edge of the door. Eventually, due to rubbing of the opening/closing of the car hood or door, the insulation will wear through leaving bare copper wire just ready to short out to the body of the car. Oh, this set-up had no fuse close to the battery. Also, it just looked ugly.
Another “bad” method, was a ham picked the first live wire he found under the dash. This happened to be the one supplying power to the headlights, he bumped the switch while looking for power. This meant that 1) the radio only worked at night or at least when he had his lights on, and 2) the headlights dimmed with modulation of the radio. I had a hard job not to roll on the floor laughing while I re-wired his radio.
Lets take a look at some proper ways of running power to a radio.
Firstly ALWAYS and I'll repeat that, ALWAYS place a fuse as close to the battery as possible. The photo below is of my installation. The blue and clear box contains a 100A fuse (overkill, but that's what it came with) and is secured to the air filter canister with double sided tape. Not an ideal method, but the best option I had with no place I could used screws. It has a heavy duty (4 gauge) cable going out of it to a second fuse box. This cable was run as far away as possible from any auto wiring, while keeping it to a reasonable length. The black split tube you see protects the cable that goes to the positive of the battery.
Not shown in this photo is a second 4 gauge cable that runs from the radios ground point to the negative terminal on the battery. I do not trust chassis ground to be a good RF proof ground.
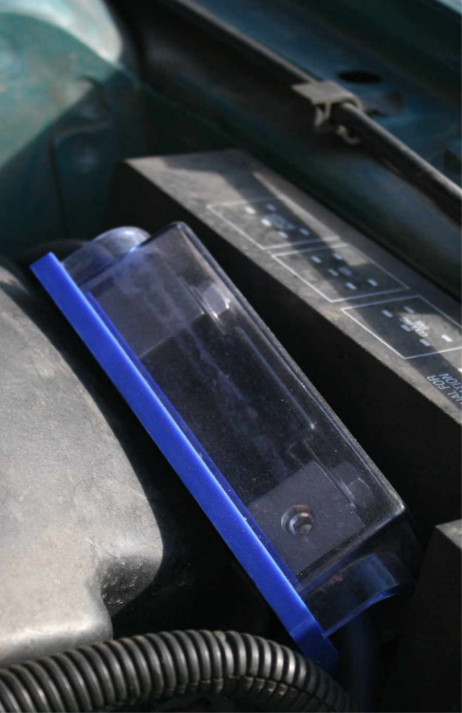
The second fuse box then gives me two output connections (only one currently in use), each of which support up to 50A fuses, (more on the second fuse box later). This gives me three places that current can be interrupted, either deliberately or because of problems.
This photo shows some points that go towards a good power installation:
1) Fused as close as possible to the battery.
a) safety of the car and occupants.
2) Power is taken directly from the battery and not some source inside the car.
a) reduces the risk of damage to the radio
b) reduces risk of getting RF into critical car circuits, such as the Engine Management Computer.
3) The heaviest feasible cable is run as close to the radio as possible.
a) reduce voltage drop compared to a similar run of smaller cable
b) allows for expansion, without needing to run another cable.
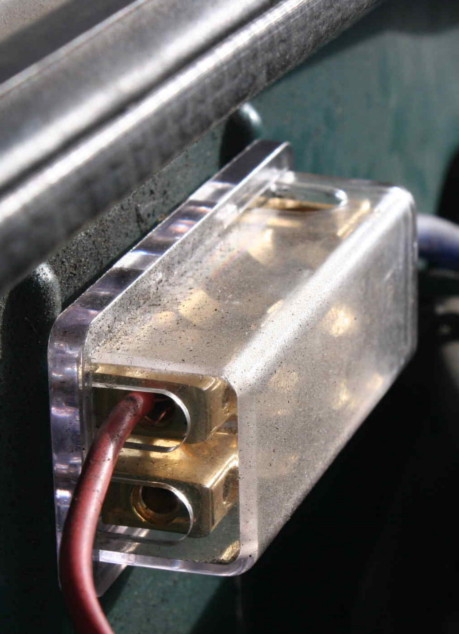
Now for that second fuse box. Usually I'll mount this inside the car, and it may get moved later. This one is in the engine bay, simply because I had no rubber grommet big enough to fit it where it would go through the firewall. By the way, once I have the wire run through the firewall I fill any space in the grommet with silicon sealer from both sides for waterproofing and to reduce chance of engine fumes leaking in. This fuse box or panel, allows you to connect more than one radio to the battery feed line, without having to splice wires together. It gives each item (my spare one will get a multi-outlet cigarette light block installed for GPS, iPod etc) a separate fuse. This way if you lose one radio, you have a good chance of a second, third, etc still having power.
RFI Reduction/Prevention
So our next step is making sure we have reduced the chances of noise from the vehicle affecting the radio, and the radio affecting the vehicle.
There are several things that can be done to aid with this:-
1) Twist two wire cables 3-4 times a foot
2) Fit a choke as close to the radio as possible (ask me about a cheap simple, effective choke)
3) In real bad cases try shielded cables. Try it with both ends of the shield grounded and with only one end grounded. One or the other will help, and the other may make it worse.
4) Keep radio power and coax as far away from auto wiring as possible – especially any wire going to the car's computer.
5) A 1uF capacitor from the positive to ground of any item that generates noise in the radio may help. I once had a Kia that had S9 noise form the fuel pump, and while this trick did not remove it completely, it did reduce it to a manageable level.
Prevent Damage To The Radio
Some (most) car generate an uncontrolled high voltage from the starter motor when you release the key. This voltage is big enough to damage a radio, if the cars wiring allows it to reach that far. To reduce the odds of this happening to your radio, you can either fit a manual “kill” switch (No. Turning most modern radios off doesn't work as most have some circuits that will always have power on them when the radio is connected to a power source), or a relay.
The problem with the switch, is it relies on you remembering to turn if off before starting the car. Fitting a rely will do it automatically. The relay breaks the positive (after the fuse box) and possible the ground when you turn the key to the Start position. On most cars, wiring the coil of the relay to the ACC position of the switch will work. The voltage at this switch position, will generally be too low to activate the relay's coil when starting the car. In some cases you may need to find another point to drive the relay.
In my 35 year old MG, there are two terminals in the engine bay that are designed to do just that, drop a relay out while starting, but energize it when the car is running. Admittedly, this was not for radio usage but to run Daylight Running Lights that some countries required. I fact, your cars DRL, is probably another good place to power the relay.
OK, I guess that pretty much covers power, just remember you can ask any questions you may have to either myself or any of the other Techs on the forum.
Next time, Mounting The Radio.
Tech 237
Forummaster
CEF001
CVC001
|