| Author |
Message |
    
Brain_damage
Member
Username: Brain_damage
Post Number: 73
Registered: 4-2005
| | Posted on Monday, December 24, 2007 - 2:05 pm: | 


|
friend of mine just ordered coax he said the # of it is 218 and its $5.50 a foot any one ever hear of this coax |
Tech808
Moderator
Username: Tech808
Post Number: 14906
Registered: 8-2002

| | Posted on Monday, December 24, 2007 - 2:35 pm: |
|
RG218 (RG218 COAXIAL CABLE).
Impedance = 50 Ohm.
Attenuation dB/100m= 3. F= 100 MHz.
Attenuation dB/100m= 5. F= 200 MHz.
Attenuation dB/100m= 8. F= 500 MHz.
Lon~Tech808
CEF#808/HAM#001/CVC#002
Tech808@copperelectronics.com
|
Patzerozero
Senior Member
Username: Patzerozero
Post Number: 4084
Registered: 7-2004

| | Posted on Monday, December 24, 2007 - 3:08 pm: |
|
semi-high power is what it's used for. 50 feet of rg218 will handle about 7kw avg at 27 mHz. so unless he's running 32-64 transistors or a 3cx4000 tube.....overkill & waste of money.
For more help & information you can go to www.google.com
and in the Search Box type:
Coaxial Cable Attenuation & Power Handling Calculator |
Nvdoug
Junior Member
Username: Nvdoug
Post Number: 11
Registered: 2-2009
| | Posted on Friday, February 27, 2009 - 7:59 pm: |
|
Hello All, I just ordered some RG213 for my base set-up. I thought the CA-400 would be too stiff for where I would bring it into the house. Anyway I have never used or have soldered on RG213 before. But have done PL259's with mini8. I called Copper's Tech and asked if the ground should be soldered because it fits snugly into the PL259. "To be done correctly, it should be" was his reply. The reason I called and asked was, I have a jumper of RG8u and when looking at the connector, the grounds were not soldered. I don't even know where I got that stuff. But it is now going to be my practice piece. Would someone Please explain the correct way to solder the grounds on the 259/213. I don't know if I should try and shove the shielding all the way to the end of the threads or just enough to snug up the end. Thanks
Northern Nevada
CEF#1019
Doug
|
Tech808
Moderator
Username: Tech808
Post Number: 16632
Registered: 8-2002
| | Posted on Saturday, February 28, 2009 - 2:42 am: |
|
How to Properly
Install / Solder
PL-259
Coaxal Connector's
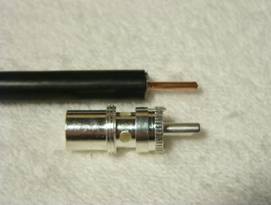
Strip the coax back about 5/8" of an inch all the way down to the center conductor
Now strip the outer insulation (generally black) back about another 1/2" down to the braid/shield.
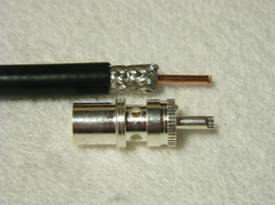
Now cut the braid/foil back about 1/16" and make sure to that none of the braid or foil is touching the center conductor which could cause a short.
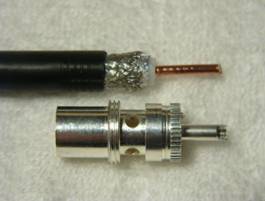
When your coax is ready for soldering, make sure that you put the sleeve of the PL-259 on before you put the body of the PL-259 on the coax.
You would not believe how many times I have forgot to do this over the years. 
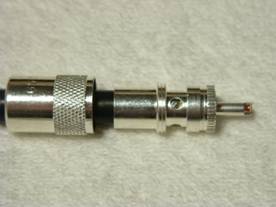
Then install the PL-259 on the end of the coax and grip it with a pair of pliers or vice grips / pliers and screw it down untill the center conductor is even with the end of the center pin of the PL-259.
NOTE!
Now before you solder the PL-259 take a Volt/Ohm meter and make sure that theree is NO continuity between the Center Pin and the Body/Outer screw on connector.
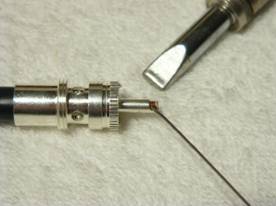
Then heat the center pin of the PL-259 connector with your soldering iron and "CLEAN" it "BEFORE" you start soldering with a damp rag or sponge to make sure it is CLEAN and is at operating temputure.
Always make sure that your soldering iron is on the Bottom side of the center pin.
Always "Pre-heat" the center pin before you apply solder, and allow sufficient solder to flow into the center pin to seal the inside of the center conductor.

Then make sure that you fill all of the holes generally 3 or 4 depending on make of PL-259 you are using with solder until it is flush with the top of each hole and allow to it to cool.
Before using your coax allways double check your work to make SURE that you have NO resistance between the center pin and the body of the PL-259 with an ohmmeter in a low resistance scale.
Hope this help's,
Lon
CEF#808~HAM#001/N9CEF
CVC#002
Tech808@copperelectronics.com
|
Nvdoug
Junior Member
Username: Nvdoug
Post Number: 12
Registered: 2-2009
| | Posted on Saturday, February 28, 2009 - 7:02 am: |
|
PERFECT Thank You -(again)- I'll be ready when the coax arrives.... Now I'm off to that four letter word (work)
Northern Nevada
CEF#1019
Doug
|
Slugo4449
Intermediate Member
Username: Slugo4449
Post Number: 181
Registered: 7-2004
| | Posted on Saturday, February 28, 2009 - 6:50 pm: |
|
Doug:
A little trick to make grounding the pl-259 easier.
If you have a dremmel tool use a small grinder(in the shape of a spinning top) to grind out the holes a tiny bit. Just enough to get the coating off so the area will take soldier better.
Don't do this on silver or gold plated ones just the nickel plated ones(the cheaper ones)
73,
Marty |
Tech808
Moderator
Username: Tech808
Post Number: 16637
Registered: 8-2002
| | Posted on Saturday, February 28, 2009 - 10:42 pm: |
|
Slugo4449,
Thank You! for the "GOOD HELPFUL TIP". 
As I have alway's said:
No one will ever hear me say I know everything about anything and I am always willing to learn.
Lon
CEF#808~HAM#001/N9CEF
CVC#002
Tech808@copperelectronics.com
|
Nvdoug
Junior Member
Username: Nvdoug
Post Number: 13
Registered: 2-2009
| | Posted on Saturday, February 28, 2009 - 10:42 pm: |
|
Marty,
Thanks for the tip. I do have a dremmel and a small top/cone shaped grinder. Not sure if my connectors are the cheapos or not. But I'll sure practice on my old jumper
Northern Nevada
CEF#1019
Doug
|
Stepchild
Intermediate Member
Username: Stepchild
Post Number: 183
Registered: 11-2002
| | Posted on Friday, March 06, 2009 - 8:17 pm: |
|
THAN YOU LON!!!! Very good information and PIC's
You don't know how bad I've been needing that example right there!!!
BTW, I thought I was the only one to forget that kind of stuff. LOL Thanks again, Great job.
Stepchild
CEF-187
|
Zman
New member
Username: Zman
Post Number: 4
Registered: 4-2009
| | Posted on Friday, April 17, 2009 - 10:29 pm: |
|
Well now i know im not the only one that has goofed up and forgot to put the sleeve back on before i put the body on! |